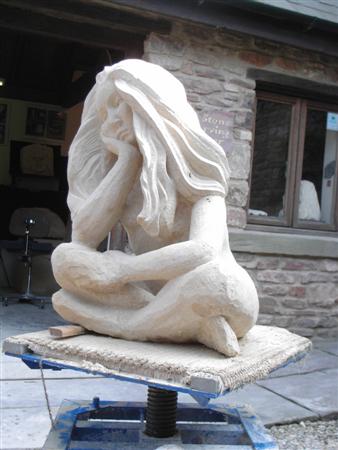
Portland Limestone Art Nouveau style dancing lady

13 September, 2008 – 10:16 pm

I have found myself falling quite by accident into an Art Nouveau style of carving, with my ladies and their long flowing hair, the idea of carving a feeling, not necessarily a perfectly formed human figure. However I hope I never carve anything disturbing.

From this I have decided to follow this natural train of thought, the romanticism, the natural beauty of nature and the female form. Hopefully this is evident in Dancing in the wind, one of my previous carvings.

I am trying to create lightness, delicacy and movement in a material that is so obviously heavy and un-moveable, and trust me, sometimes I wonder how I move it!!

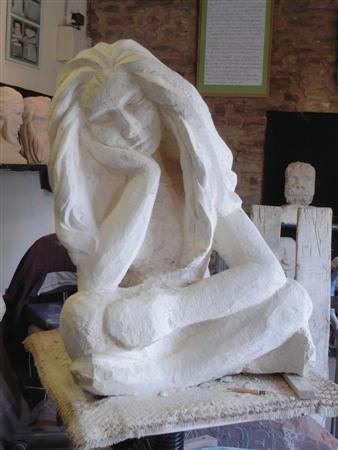
So anyway, this is my block of Portland limestone. I bought this stone among other pieces from Albion Stone quarry, on Portland in Dorset It is recycled from a dismantled building-I like to think that I am helping by not depleting the resources of this beautiful island!

Portland Limestone is incredibly hard and has been used on many historic buildings, obviously most famous for St Pauls Cathedral in London.

I mainly use my Tungsten tipped chisels on it, as it damages the edge on my Cold steel chisels. However there will be times as the carving progresses that I will need to use my finer cold steel carving chisels.

So I start with my Pitch to remove large amounts of stone quickly and efficiently. Then I start with my Punch, see later photos.

I use the Tungsten tipped Punch , I could use my regular cold steel chisel but I would have to sharpen it regularly, therefore wasting my metal.

The Tungsten tipped Claw to remove more material in a more controlled way.

The quarter inch chisel to create safety margins to carve up to, in order not to accidently remove stone that I want to keep.

 Chisels that have rounded ends tend to be used with a wooden mallet, funnily enough these are called mallet headed chisels, generally pitches, punches and some claw chisels are used with a hammer, and are called hammer headed chisel, they tend to have flat ends.

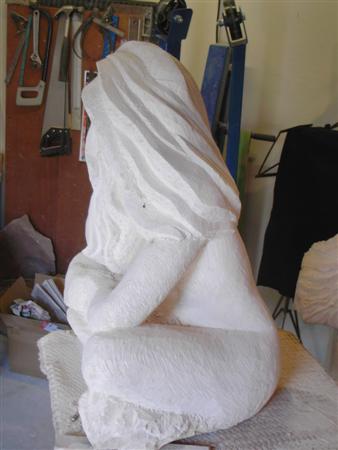
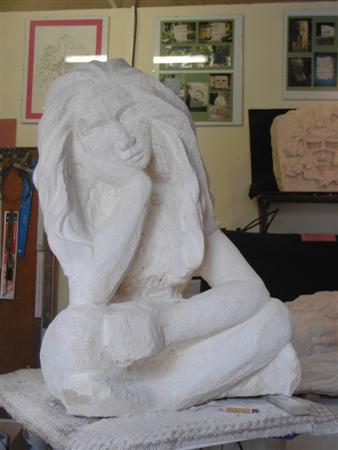
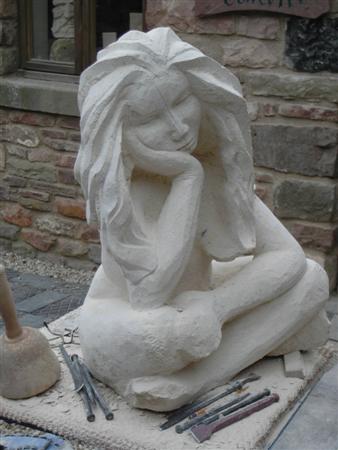
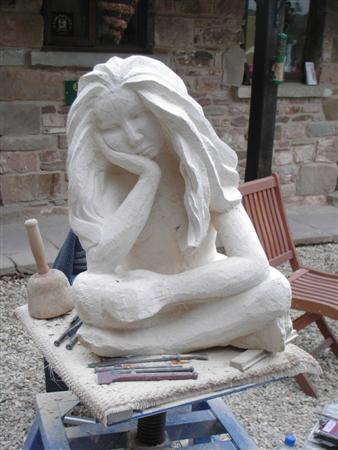
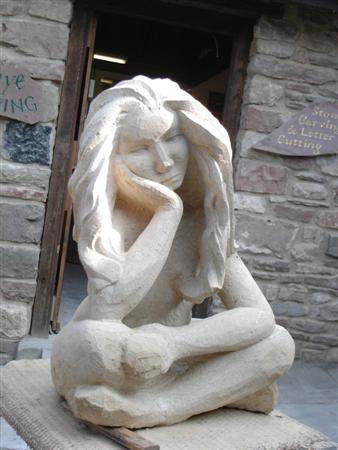
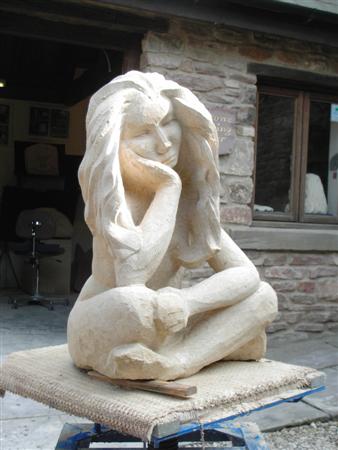
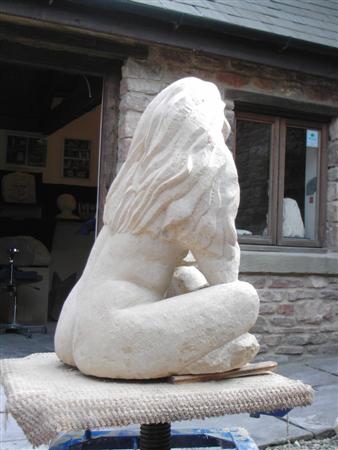
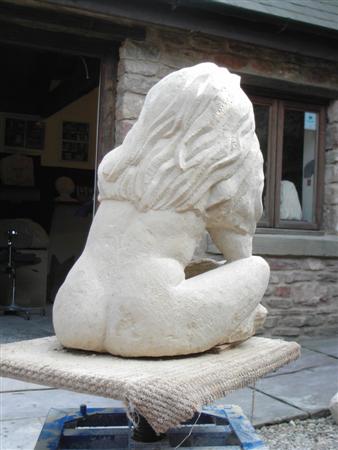
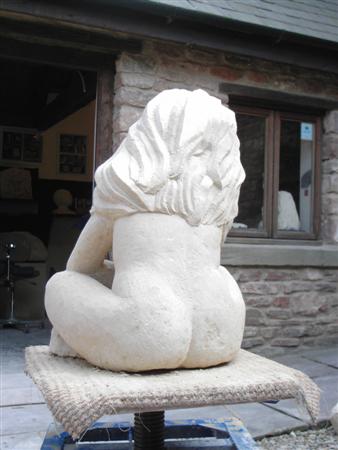
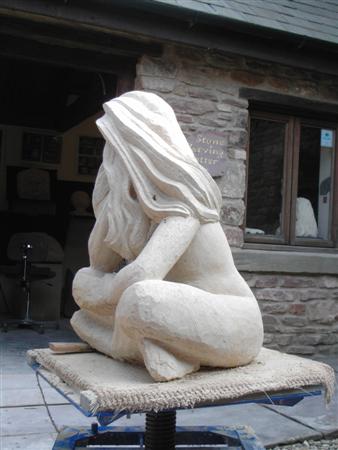
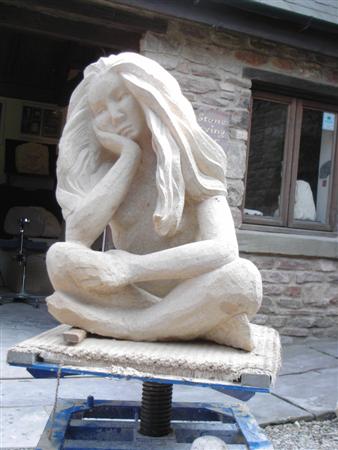
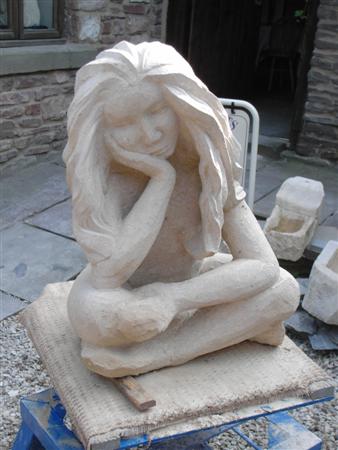
 These next pictures are the sculpture in progress. I start to develop the idea more and explore the movement of the carving, how does the hair move around the fabric? How does the fabric and the figure interact?. I could see that the legs didn’t work and so proceeded to move things around, I increased the depth around the figure. Started to carve the fabric and hair around the back so that it started to inter-twine, it began to look like it was plaited.

 Developing the back of the carving was as important as working the front, this is something that I have learnt from the previous carving, Dancing in the Wind. Obviously every time I create something new, I learn how to carve more efficiently, but also how to create a coherance in the carving between each feature.

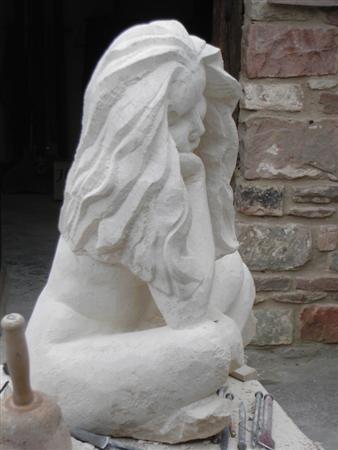
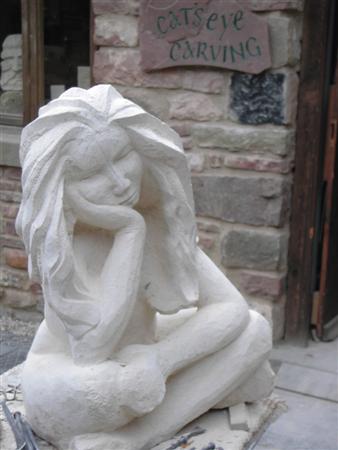
As you can see there is still quite alot of carving to do, as soon as I have some more to show you I will write another post.

So you will have to wait and see!!

Share

My Workshop

31 August, 2008 – 10:04 pm

For those of you unable to visit me, or who haven’t had a chance to come down lately, here are some photos of my workshop!!

Share

Meditation, A Tetbury Limestone Sculpture.

23 August, 2008 – 7:12 pm

As you may have read from some of my other posts, not everything goes to plan when carving detailed sculpture.
This is an example of when everything goes right.

Meditation is a bust of a woman, she is wearing a scarf around her hair that drapes around her neck.
This stone carving was inspired by some of my charcoal drawings. Our model was a very elegant woman. She sat perfectly still and when asked how she was able to maintain her pose so well, she replied that she was meditating.

As with all my carvings I roughly mark on the surface of the stone where I want the features to be. The most important lines I mark on are the axis lines, imagine a line down the centre of your face and one from side to side through your eyes. These lines determine the angle at which the face is, whether her head is tilted to the side or the front.

The natural bed of the stone runs vertically through the stone to give strength to the carving, as the finished carving will be delicate through the neck.

I started with my punch, the chunky nail shaped chisel, and the pitching chisel-for removing large amounts of material. ( I will put some images of my chisels on a separate post!). Then my claw chisel for defining some of the features. Of course I had to leave enough material in order to create the scarf. But as with all my carvings knowing how much to leave on comes with experiance.

As the carving developed, I was aware that this carving was going to be something special.
The fabric was beginning to look as though there really were folds and the detail around the nape of her neck was beginning to take shape.

I just needed to soften the features to create a more reflective feeling to the carving, and put the finishing touches to the hair, neck and shoulders.


 This carving is of a more mature woman she looks as though she has a strong character, I believe that this reflects how my carving and myself are developing.


Share

Dancing in the Wind. Stone Sculpture

4 August, 2008 – 7:00 pm

This Carving was completed about three months ago. It is the most detailed stone carving that I have created on such a small scale.

Every time I start a new carving I have an idea of what I would like it to look like in my head. This one was inspired by the elegance and free flowing form of the Art Nouveau Period.

The piece of stone that I used was from Veizeys Quarry in Tetbury, Gloucestershire. It is approximately 18″ high. There was quite a lot of shell within the material which adds to the finished effect.

As it was a complete rectangle I was starting with a completely blank canvas-in so much as it had no surface features to guide me to the final shape.

I sketched on the surface what I wanted the carving to look like and from this I could block out the bits I didn’t need before concentrating on the features. I didn’t do much on the back to start with as all the time I had a flat surface I could lie the stone down to work on it.

By taking out the middle portion, I was aware that this could add weakness to the stone, however I had the natural Bed of the stone-how it it formed in layers-on its edge, ie running from top to bottom. This gave the stone an added strength, if it was carved naturally bedded, ie side to side, then there would be a weakness across the middle.

By taking out the unecessary stone from the middle I had left the carving top heavy, so proceeded to take some of the weight from the top. This carving had to give the feeling of light, delicate, free flowing movement, something that stone is not known for!! The idea was to have a figure dancing, with her arms holding fabric above her head, which in the light summer breezes is billowing above her head and draping across her body. I am striving to push my abilities and test the limits of the stone!!

The big chisels that I use are not needed for long, and soon I am moving onto my finer carving chisels, these are able to rough out on a smaller scale, as I work in the details of her body, working on the scale of 1:7, head to body ratio. If you were to measure the size of your head, then it should fit into your body 7 times.

During the Art Nouveau Period the limbs of the female subjects were often elongated to add more grace to the paintings, drawing and sculptures. however although I worked on the principle of 7:1, I kept this idea in mind and used my judgement to decide what looked right to me.

As the sides of the carving were progressing I couldn’t leave the back out of the carving otherwise it would look like an afterthought. As I have mentioned before It is important to keep the flow of the carving consistent in order to maintain a balance.

The idea that I was working from was fluid in my mind and each time I started working on my carving I could see where improvements could be made. Features could be improved upon, I pushed the stone trying to find the limits to which I could carve. unfortunately I pushed too hard. I was working on her arms, both raised above her head, as she faced forward, as I was chiselling with a mere 4mm chisel the centre section of her arm came off. This was not a fault in the stone, just my own inexperience of this subject matter. however I look on every misfortune as a learning experience. even the gentlest taps with a chisel would be too much, it was time to get out the files and rifflers.

I had always finished any figurative carving that I had done with my chisels, so the thought of sanding and filing to finish this carving was quite alien to me. However this is me learning something I hope never will stop.

The final finish would not have been possible if I had not made that mistake. To correct the issue of the arm, I removed all evidence of its position, I still had enough material to put it in two places. One behind the fabric and the second up behind her hair, which was long and flowing so could be carved to look like there was something behind it. the latter is the one I chose. In order to make this look convincing, I had to twist the body around.

 I could not have hoped for a better outcome as this was a better pose than I had originally thought of!! The movement and freedom of my Dancer was just as I wanted her to be.

I hope you agree, and just remember it is not a mistake if you learn from it.

Share

Pins and Needles Stone Sculpture

14 July, 2008 – 5:00 pm

This is Pins and Needles, so called because if she ever stood up that is what she would have!!

When I carve I never concentrate on any one feature, it is important to maintain a flow between each feature. This was the biggest and first full figure that I had carved. So it was a very exciting new challenge. The piece of stone I had for this was from the scrap pile of my favourite quarry, Veizeys quarry near Tetbury in Gloucestershire. It has beautiful carving qualities, its hardness enables me to create strong lines and good detail. It is very dense and consistent in it’s bed. The bed is how the stone is laid down and formed.

The piece was not a full rectangle it had a slight slope at the back and was missing a corner at the top on the right. This encouraged me to create the shape as it is. I made a small clay maquette (model) to identify the proportions. It was not something for me to copy but a visual aid. It was only about 5 inches high and sadly I knocked it off my stand and it shattered, it was only made of clay.

The first thing that I do is to roughly sketch on the face of the stone the design that I would be carving. Then set to work. First of all I start with a half inch chisel and carve around the pencil lines. Once I have these safety cuts in place I go in with the big chisels. The punch which is like a big nail, this is for roughing out. The pitch, which has a slight angle on the end-the edge is placed against the stone at a bit more than 90 degrees and struck hard with a hammer, this removes large amounts of material, but can only be efficient when used on a flat surface.

I remove more stone with my punch and roughly identify key elements of the carving, until the time when I can start using my claw, this is used to remove material in a more controlled way and using this I can start to identify more features.

As I was working 2 faults emerged from the stone, before I start I check the material for defects. One method is to tap the stone with a chisel , if it rings then the stone is good otherwise there may be a dull or rasping sound. The same way a professional may check a bell or a piece of porcelain. However when I checked the stone I missed this. I continued working to see if these faults would work out, one being down the front and one down the back, obviously this was my main priority it would be pointless continuing if the stone was dead. These defects did work out and actually helped my progress as all the while I was concentrating on this problem I was removing large amounts of stone fearlessly.

The next decision I had to make was putting the hollow through the arms to join the front to the back. If I left it I would have a front and a back, which may not join up, but the carving would be safe until it was time. I had to carve through the underneath of her arms in order to maintain the flow of the carving.
It was important to ensure that I left enough stone to carve in the important final features.

As the details became more developed the tools that I used became more delicate, features became more refined, the hollows were finding their way through as I became more confident. I had put hollows and windows through some of my other carvings but I had invested so much time in this carving I got a little burst of excitement with each one.

As I started putting the finer details in I turned my attention to the hand on her knee, unfortunately the fault that ran through the front reared its ugly head!! As I was carving her fingers the first three sheared off, I couldn’t say too much because I was surrounded by onlookers it was a lovely sunny day and I was working outside!!

I finished the carving which was only a week, sawed through her wrist and chopped out the dead stone. I pushed clay into the cavity and built a new hand. From this I carved a new hand in a colour matched piece of Tetbury Limestone. Each time offering it up to see how much more there was to come off to make it fit. Once I had it fitting snugly I drilled two holes in the new hand and two corresponding holes in the thigh. I glued one stainless steel dowel in the hand and then grouted them both in the thigh and filled the surrounding cavity with this grout. A liquid mix of lime and stone dust. I allowed this to dry for a week before trimming the new hand to fit the wrist and the knee. This is an invisible repair and is as strong as the stone itself, and is a testament to my training as a stonemason!!

In some Roman and other historic sculptures this is how they fixed arms, hands and heads. Obviously not using stainless steel dowel!!

Share